This webpage is an accompaniment to the facilitated workshop. It contains:
- What even is a website?
- What could you put on your website?
- How to access a remote server
- Basics of HTML+CSS
- A really brief cheatsheet
This workshop will teach you to make a website which you can understand and maintain. This means the emphasis will be on simple websites. After all, we are on the web to see what you do, not goggle at fanciness.
What is a webpage?
A webpage is a plain text document that your browser can display with style. You can get webpages from your own computer or, much more fun, somebody else's.
Your computer asks for a webpage from somebody else's by sending a HTTP request. This is a message that describes what you are asking for, and how. If it is correctly written, then the other computer will send back a HTTP response which will contain the thing you asked for.
If it goes wrong, you will get back a HTTP response containing an error of some sort. For example, if you ask for a web page that does not exist you will get a 404 error.
What to put on your website
You can use your website for anything. The key part of making your own website is that it is your website and you get to decide how it looks and what goes on there. You don't have to make your images square and suitable for prudish advertisers. You don't have to confine your thoughts to 140 character soundbites. You don't have to look at loads of waffle before you get to the recipe.
For the sake of this workshop, here are some things you could write about:
- Projects you have made in the hackspace
- TV shows, films, games, music that you like
- Favourite spots in Nottingham
For more ideas, you could look at other peoples' websites. my website contains poems and collages about my month. Alifeee's website contains hitchiking blogs, board games, widgets and more. Aaron's website contains writeups of lots of projects, cool year-end reviews and graphs! There is a long list of personal websites on the Neocities browse page or at the start of Alifeee's workshop.
Making your first webpage
So, we have learned that wepages are plain HTML documents that your browser can ask for from another computer and then display to you. You could keep all your webpages on your laptop and, by telling me which ports to bind to, I could access them. However, you might want to turn your laptop off, or not have me constantly accessing it. Most people keep their webpages on someone else's computer which is very rarely turned off -- a remote server.
For the first part of this workshop, we are going to use a computer owned by the hackspace. They named this computer jarvis. For this part, your website will only be accessible from within the hackspace.For the second part, we will make it so anybody can see your website. To do this we will use the computers owned by neocities.
For now, open a file browser and make a new folder called "my-website". Open notepad or gedit and write something, anything. Save this file as "index.html" (exactly) and put it in the my-website folder.
This file is your website. Earlier I said that websites are plain text files. This means two things: firstly, you must create them using a plain text editor such as notepad or gedit, and not Microsoft word or Google docs (because they add extra information your browser can't understand). Secondly, it is up to the browser to make them look a certain way. To see this, we need to put them in a place the browser can find.
Accessing a remote server
SKIP THIS SECTION TODAY. Go to neocities.org and make your website there
To upload files to the remote server, we will use a program called an FTP client. In this case, filezilla. Please download this now. Run it, and follow these steps to connect to jarvis.
- Type
sftp://jarvis.nottinghack.org.ukas the host - Enter your hackspace username and password
- Set the port to 22
- Click connect, and accept the fingerprint if it pops up
Now, on the right hand side of the page, you should see a file tree that has your username. Click on the little arrow next to that, then the directory labelled public_html (you may need to create it by right clicking). Then, on the left hand pane, navigate the file tree to the my-website folder you made previously. Drag and drop everything in that folder into the public_html folder.
Now in your web browser, go to "http://jarvis.nottinghack.org.uk/~<your hackspace username>/" you should see whatever you typed in index.html. Congratulations! This is your first webpage.
For the next part of this workshop, we will continue in a similar way. We will teach you the HTML and CSS you can use to make your webpage, and then you will save the file, and upload it to jarvis again. Later we will use a different method to put it on neocities, where anybody can access it.
Work with the workshop facilitators to make your plaintext document containing any text and upload it to jarvis. We will continue once everyone can go to "http://jarvis.nottinghack.org.uk/~<your username>" and view the page.
Basic HTML+CSS
Let's add some more to your basic webpage. HTML is a programming language which describes what your website contains. CSS is a programming language which describes how it should look. Nearly every website you visit consists of HTML and CSS.
HTML and CSS are plaintext documents. This means you need to write them using a text editor such as notepad or gedit (or vi or vim or neovim), and not Microsoft word or Google docs which will do a load of extra things your browser can't understand.
HTML
HTML consists of text surrounded by tags. These tags state what purpose a piece of text serves. Once it is surrounded by tags it is termed an element. For example, the above heading was marked up as <h3>HTML</h3> which means it is a third-level heading. Most tags need to be opened and closed. So before your text, you put two angle brackets: <name of element> and aftewards you do the same but include a forward slash before the name </name of element>, so the browser knows you have finished.
HTML is nested. This means you can use have elements inside of other elements. For example, these (orange) paragraph elements contain (purple) code elements, which get marked up in a different way by the browser. The excuse above was an (green) <aside> element containing an paragraph element containing a code element. This entire webpage is contained within a HTML element.
As you write your webpage, you should make sure to surround each piece of text with the correct tags to mark it up. There is a list of the most common tags and their purposes at the bottom of this document, and you can find longer lists online.
The 5 most common elements
The content of most webpages are made with only a handful of HTML elements. These are:
| Element | Purpose |
|---|---|
| p | paragraphs |
| h1, h2, h3, ... | headings |
| ul, ol, li | unordered lists, ordered lists, list items |
| a | links (see below) |
| img | images (see below) |
To see an example of a webpage using mostly these elements, right click on this one and click "View source". You can do this on most websites to see their source code. If it is a good website, you will be able to understand it...
There are some HTML elements "all" websites "need" for a variety of historical and convenience reasons. These are quite technical, and not that important. Here is an example, minimal website whose source you can copy for your own. Write your own website inside the "body" element.
This minimal page contains a "head" which is not displayed but contains useful information such as what language your website is in, or where to find information about what it should look like. We will use it later. The <meta> elements are used to make the site work properly on mobile.
Linking pages together with the anchor element
My favourite HTML element is the anchor element because it lets you link webpages together. To do this we need to understand paths and attributes and have a second webpage to link to!
Use notepad or gedit to make another webpage. Copy from the minimal page above, write some HTML, and save it under a different name with the extension ".html". Next, use filezilla to upload it to jarvis. We should be able to view this page by typing "http://jarvis.nottinghack.org.uk/~<your username>/<the name of your new webpage>.html". Maybe make a few more webpages, just for fun!
Now we will learn how to make hyperlinks to join webpages together without having to type their names into the address bar. So far we have used HTML elements to tell the browser what the purpose of each piece of text is. We can also add additional information, or attributes, to an element that aren't automatically shown. For example, the "src" attribute is where an image or piece of media is stored. The attributes for an element go inside the opening tag, so to add an attribute to a paragraph, we go: <p class="fancy"> ... where the value of the attribute goes in quote marks.
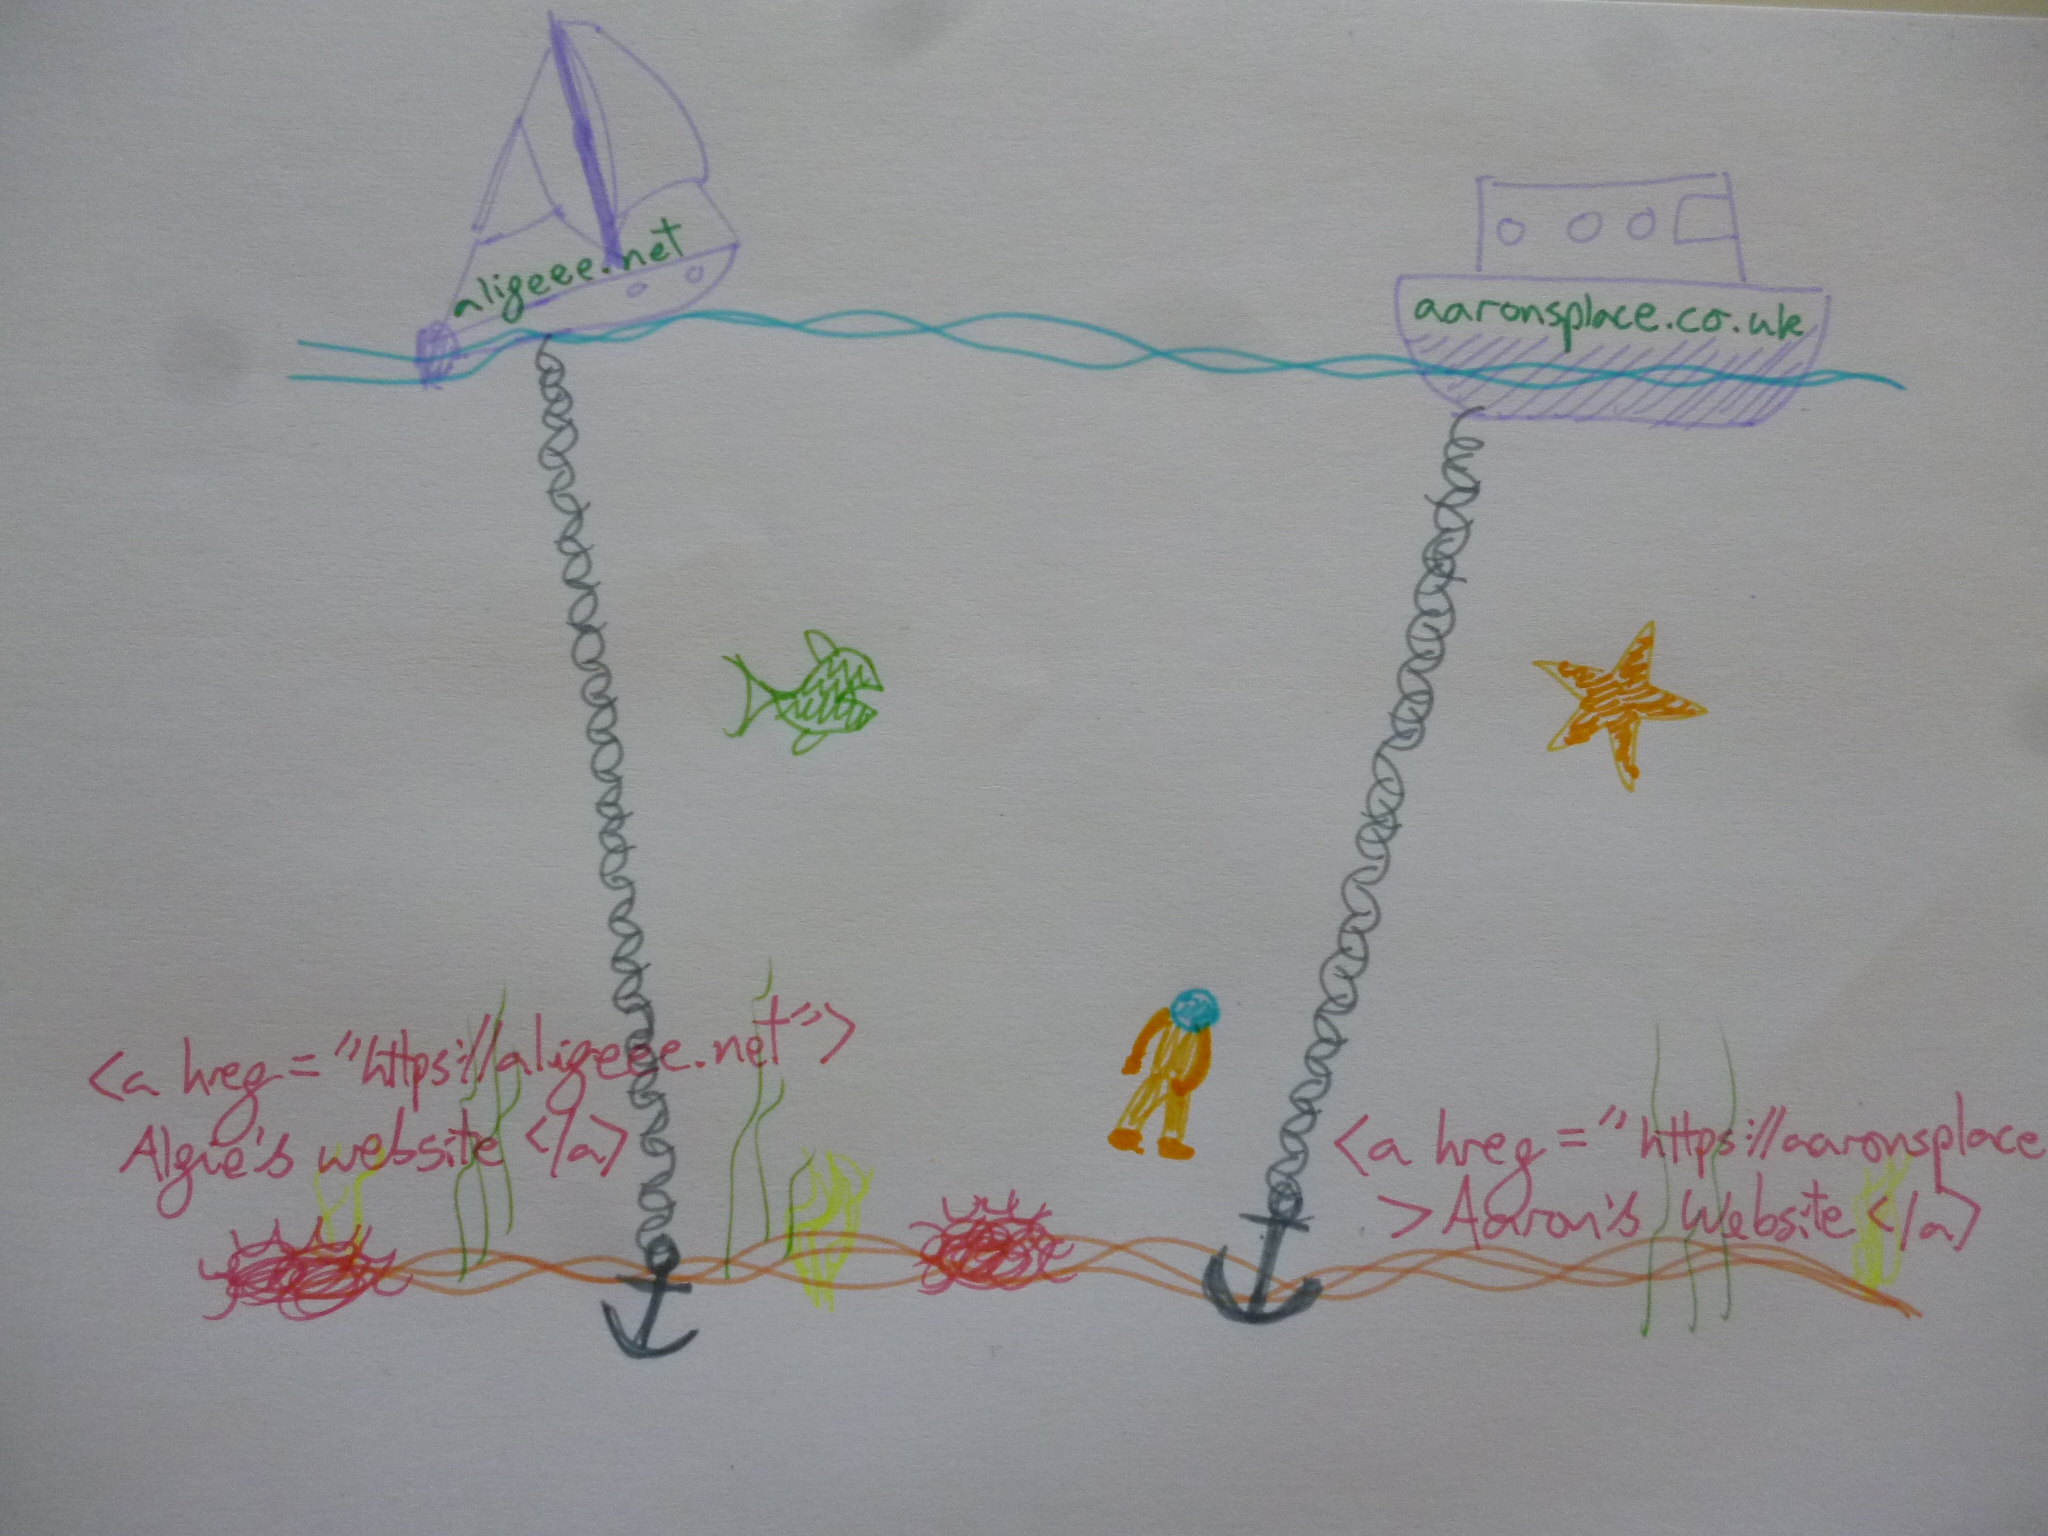
The anchor element is used to create hyperlinks, and the "href" attribute is used to store the destination of the link. To remember how this works, I like to imagine that websites are ships, and to browse the web I've dived into the ocean. At the bottom of the ocean there are labelled anchors from all the ships I can reach. The chains lead me to the destination website sailing on the surface.
The "href" attribute of the anchor element tells you where to go. This is a path to the destination webpage. For example, to link to Aaron's website, I might write <a href="https://aaronsplace.co.uk">Aaron's website</a> which will make a hyperlink like Aaron's website.
To link to other pages on the same website (such as yours!) we set the "href" attribute to a relative path from the current page to the new page. For example, if all your pages are in the same folder, then we can link to a new page about Nottingham from "index.html" by adding: <p>View my new <a href="./nottingham.html"<webpage about Nottingham</a> here.</p>, where we've used nesting to put this hyperlink inside of a paragraph.
A path is a text description of a location on the computer. On filezilla, we were looking at files arranged in a hiearchical tree. A path is a way to describe where one file is, relative to another, in terms of this tree. For example, currently we are in the "website_workshop" directory of my website, but if we follow the path "../nmri/" we go up a directory (".." to the parent directory, which I named "public") and then we go down ("/") into the "nmri" directory and now your browser will display a website in there.
As you make more and more webpages, you might find it helpful to organise them into separate folders. If you do so, you will have to update all the paths in your anchor elements to point to the new locations! That's annoying but it's not too hard. You can ask for help :))
Once you have multiple webpages linked together, you have made a website.
Including images
Some elements, such as the ones used to include images, don't need to be closed. This is because they don't contain any text by themselves. The image element can be used to include images, which are specified using the "src" attribute. This contains a path to the location of the image, relative to the current webpage.
The source code for the below image is: <img width="60%" src="./anchors.jpg" alt="A picture to describe how I think about anchors."/>
Add an image to your website:
- Get a picture on your computer (use one you made)
- Use filezilla to put it in your "public_html" directory on jarvis
- Write an img element into your website containing the path to your photo in the public_html folder on jarvis
CSS
So far, we've spent a lot of time describing what your website contains, but not how it looks. Let's change that. CSS is a different programming language to HTML, so it ends in a different file extension so that computers can tell the difference. Make a file in "my-website" called "style.css" and edit it (with a plaintext editor).
CSS documents consist of a series of rules. Rules consist of selectors, which select which element of the HTML they will apply for, and assign values to properties. For example, to make the background of each paragraph (p) element orange, I wrote the following CSS:
                    p {
                        background-color: orange;
                    }
In CSS, the selector goes first. Then in curly brackets go the properties and values to be assigned to elements matching the selector, in this case, every paragraph element.
For now, we will only select based on HTML element type, but you can also select based on id or class. These are HTML attributes that you have to manually assign to an element to make it be selected, but they can be useful.
The CSS properties are what actually alters the appearance of your website. These are things like "background-color" or "border" but also things like "top", "bottom", "left", "right" which alter the position of an element. Positioning elements using CSS is a complex topic and not one I have a simple way of explaining...
Going live
Go to neocities.org and make an account. Choose your (sub)domain name! This is where a computer will send HTTP requests when it wants your website.
Neocities is easier than jarvis, you can just upload entire folders via your browser. You can even edit them there!
Cheatsheet
Concepts:
- Webpages are plain text documents that your browser knows how to render
- HTML describes what the text is or what it does, and CSS describes how it should appear
- Write your webpages in an app like notepad or gedit
- Your website is yours. You can put what you like on it as long as you can understand it.
HTML
- HTML describes what text does
- Surround text with <tags> like so <tags> in order to label it
- Use attributes to add additional information for the browser to use
Use hyperlinks to move between webpages. Either within your website: <a href="./path/to/page.html">my other webpage</a> or to other websites <a href="https://example.com">an example website</a>.
Use the <img src="./path/to/your/image" /> element to include images.
The 5 most common HTML elements are:
| Element | Purpose |
|---|---|
| p | paragraphs |
| h1, h2, h3, ... | headings |
| ul, ol, li | unordered lists, ordered lists, list items |
| a | links (see below) |
| img | images (see below) |
What next?
Here is a list of useful resources for programming in HTML and CSS:
- MDN HTML
Here are a list of useful webpages that contain more information about making personal webpages: